Saturday, May 31, 2014

Organize Me!!!


I decided today to drop some coin on some studio organizational tools, I bought the Clip and Spin Organizer at Hobbly Lobby this evening.  I almost didn't make the purchase because I wasn't sure if I could fill it or not, now I see I should have purchased two of them!


Another thirty or so rubbing plates that I will clean up tomorrow, seems a mouse managed to make a nest in my storage tub, and will hang the remainder of these plates on the spinner.


I still have a dozen or so alphabet stencils that need to be hung on the spinner as well, yep it's really starting to look like I should have purchased two of these!  I have to admit it is really nice to have all of my stencils out where I can see them now, I have quite a few I forgot about that I could have used at Easter for cards and such.


My Black Birds in Tree Stencil looks so good  hanging on the organizer!  For damage control I backed most of the stencils with a sheet of paper to keep them from hooking onto the next stencil.

Yes, I definitely see another spinner in my near future!

Wednesday, May 28, 2014

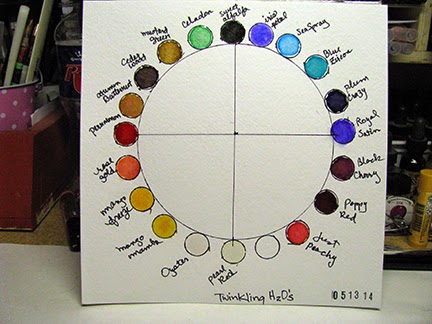
Studio Purge and Color Wheels


On Purging and Creating: I decided to take the month of June off from creating, etc., with the exception of the Art Walk here in Ames on June 6th, to focus on paring down my studio.  I've already started lining up local artists that are interested in my excess fabric, wool and silk fibers, oh and the yarn!  I have to say it's exciting, very exciting.

I had hit the wall and that wall was I cannot create anymore until I get rid of the excess in my studio it is weighing me down.  So out it goes so that I can move forward with my new Canyonland Series, and my collections for licensing.

Watercolor on Bristol board with Sumi Brush

On Color Wheels:  I love certain colors, and I tend to work ONLY with those colors in my work.  After twenty years of producing work I've decided that this is ok and these are my signature colors.  So I've been busy making color wheels in watercolor, acrylic paint, and with natural dyes, and how I achieved those colors so that they are repeatable.


On Planning:  Something I got from Lisa Call a couple of weeks ago that has lit a fire under my can is this:  "Planning is Defining the Dream!"  I started working on my business plan again, laying out the road map to where I want to go and have began planning how I want/hope to get there, and doing so has lit a new fire within me.

Tuesday, May 20, 2014

Deconstructed Screen Printing with Natural Dyes and Stencils!

Materials List: 
Silk Screens
Squeegee for Silk Screen
Stencils
Natural Dye Extracts
Gum Tragacanth Binder
Containers to hold natural dye extracts/binder I used paper cups.
Plastic Spoons
Newspaper
Masking Tape
Fabric or Watercolor Papers

Products Used:

Links:
How-to make the Gum Tragacanth Binder Video

I am here today to show you how to use stencils with a silk screen and natural dyes for screen printing.


Instructions:
Mix up Gum Tragacanth with Natural Dye Extracts; see video for specific amounts and mixing instructions.  I made a little card with the names of the extracts I was working with and daubed a bit of the color next to each name, for future projects.

The Natural Dye Extracts blended with the Gum Tragacanth are now ready for printing!

Most silk screens won’t be the same size as your stencil, however, I have an easy fix for this problem.   Measure your screen and your stencil and then block off the required space for your stencil by taping news print to the FRONT of your silk screen.  Then tape your stencil to the front of the screen making sure to overlap the stencil onto the newsprint.


Blocked off silk screen, as seen from the front.


Blocked off silk screen as seen from the back.


Black Birds in Tree Inverse taped to the FRONT of the silk screen.


Place your natural dye binder medium onto the screen, towards the edge, this is known as “the well”.  Using your squeegee pull the medium in a firm manner across the screen, once you have reached the other side, pull the medium back towards yourself, do this several times adding more of the natural dye binder medium if needed until the color on the screen looks even.


Gently lift up the silk screen from your substrate, I used 300# cold press watercolor paper for this sample.


For this sample I used the same stencil and screen to print the image onto cochineal dyed cotton fabric that I had surfaced using my hand and earth pigments and fabric paint.


Printing onto cochineal dyed cotton fabric.


If you wish for your fabric images to be free of bumps, etc., tape the fabric to your surface to keep it from moving, etc., while printing.  I prefer an organic and whimsical look and therefore don’t tape my fabric to my table.
Oliver Files: After the Storm


Oliver and his ball.  We experienced a large amount of hail today, golf ball sized hail and discovered Oliver is scared of hail!

Excuse the mess this is the "nest" he made today between the dining and family rooms, he's a very busy dog that loves to build nests and each nest requires shredded paper.  Yes he has a crate and a blanket for his crate but nothing rocks his world more than a fresh nest!


The hail was about the size of grapes when it first started falling.

WIP Sunflower


Sunflower over Black Birds in Tree Stencil with some sequin waste dots using craft paint on baltic birch panel.  I'll pull the Black Birds in Tree back out after I'm done with the sunflower and other embellishments.


Detail of Sunflower and Black Birds in Tree Stenciled image.

Monday, May 19, 2014

Wednesday, May 07, 2014

Birds in Tree with Madder Lac


Madder lac natural dye extract screen printed, using deconstructed screen printing techniques with my Birds in Tree Inverse Stencil, onto cochineal dyed cotton fabric.


Birds in Tree Inverse Stencil taped to the front of a traditional silk screen for deconstructed screen printing!  Stay tuned for more on this technique!!!

Learn more about these techniques in my eBook and Video series 
Mark Making with Nature!!! 


Sunday, May 04, 2014

Salsbury Steak


Home made Salsbury Steak with Mashed Potatoes!

Garden Plot for 2014


Half scale of what the actual garden will look like, we are moving our raised beds to the back garden this year and the space is 16x29 feet.  If I planned everything correctly I will have enough room for six raised beds and four trellis panels with enough room for a minimum of 16 tomato plants.

The green panel to the left represents the asparagus patch, at the top and the rhubarb bed to the south, yes my rhubarb bed really is that big!  The wedge on the lower right represents lawn, I have to account for the garden shed door so I can get stuff out of the garden shed.

And as I look at this sketch those two herb beds could be one large herb bed instead, lol. I'll probably rework the sketch several times as we start to move the three raised beds we already have, and then start building the other two raised beds.

I'm guessing this was a good  year for us to decide to start over from scratch with our gardening efforts.  Only one of the five blueberry bushes survived the brutal winter, haven't seen any leaf buds on the current bushes yet, and none of the strawberry plants survived.  Yep, a great year to start over!

Changes

Lots of changes coming this way, this summer will be super exciting!


Yesterday's Find


Orange glass beads, in necklace form, found this at JB Knacker in Gilbert, Iowa.


I plan to take the necklace apart and use the beads in a project, I'm not sure who would wear this necklace anyway as the beads are incredibly rough and scratchy.

Friday, May 02, 2014

Solo Show at the Sanford Museum and Planetarium


The wall!!! I have a variety of styles per say in this show, Mixed Media Fiber in the form of the niches, Paint in the form of the acrylic painted panel frames, and Encaustic in the form of the smaller encaustic paintings.  The theme is Queen Anne's Lace and Crows, so there is some consistency.


This is the only close up photo that didn't end up blurry, I will have to take new photos when we go up in a month to take the show down!

Stop by and check out my show, be sure to sign in and let me know you stopped by!!! My show runs the month of May at the Sanford Museum and Planetarium in Cherokee, Iowa!

Thursday, May 01, 2014

Crow Panels


Ok, I'll be upfront I'm not happy with these panels, I mean I like them but I don't love them.  They need more layers, more surfacing, more mystery, but alas I'm out of time!  I'll spend the next two hours attaching the hanging hardware, wrap them up and pack them for tomorrows big day.

No. 0 or My Sample Board


I found this 5x7x2 inch raised panel frame whilest looking for something else and decided it would make for an excellent test subject, hence the reason I labeled it No. 0!


Here it is with a iridescent shiva paintstik layer and then a layer of thinned gold metallic paint that I wiped off, after it was half dried, with a diaper wipe.  Now to add more glazes, birds, and frilly stuff, via texture tools.


The crow is from my Three Crows Stencil from StencilGirl Products. Dots were created using sequin waste ribbon, random frilly stencil.